
- 总体说明
百度智能云人脸识别私有化部署包是可以部署到本地服务器的纯软件人脸识别模型服务,提供人脸检测与属性分析、人脸比对、人脸搜索、活体检测等基础功能,支持百万级超大型人脸库,毫秒级输出搜索结果。此前,公司内部或为客户少量定制使用的人脸识别算法都是基于百度云在线接口。当然是免费的,企业认证后可以免费使用约10QPS,终端少请求间隔长还可以忍受的。当网络状况差,有些客户使用终端数量增多,或客户对人脸、证件号等隐私安全性等要求较高时, 在线接口就难以满足要求了(毕竟,每个QPS费用还是很高的)。然后,我们计划使用百度智能云人脸识别私有化部署包。
私有化部署包提供分布式高并发部署方案,满足无网、弱网、专网等多种网络需求,适用于楼宇监控、校园安防等数据私密性要求较高的场景以及地铁通行等超大人脸库、高并发场景。
此软件包部署在本地的服务器上,能够得到与在线API功能完全相同的接口,只有少量接口参数需要做相应的调整。
- 硬件配置
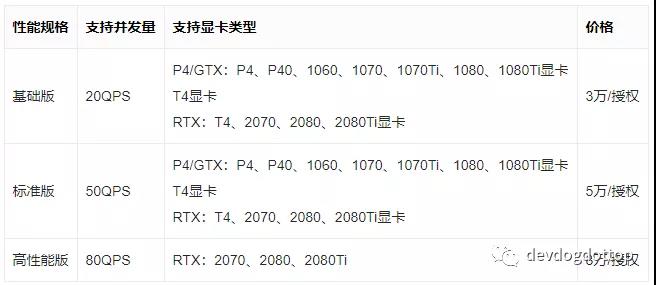
按照下图百度推荐的硬件配置说明,我预估500万人脸库大小并提高些余量。单个Tesla P4显卡可以提供最多50Qps的请求能力,基本可以满足要求

百度推荐服务器配置
我们实际硬件配置如下:
R740  14核2.0G  5117*2
32GB*8第三方
4TB SATA企业级 7.2K*1
H330DVDRW
1100W*2
X710双口万兆含2个模块
Nvidia Tesla P4 GPU*1无导轨
3年
2U机架式
- 价格说明
除了硬件服务器需要客户自备以外,百度按照每个GPU单独授权,以下为针对不同GPU和性能规格的授权价格。可以先申请最多3个月的免费测试授权,测试完成后再获取正式授权。
-
私有化部署模式
人脸私有化服务部署有两种模式:
- 单机部署:适用于数据库服务、鉴权服务、人脸识别服务均部署在同一台机器的部署场景。首先安装数据库服务,然后执行一键部署命令将鉴权服务和人脸识别服务一起完成安装。
- 多机部署:适用于数据库服务、鉴权服务、人脸识别服务部署在不同机器上的场景。建议数据库服务安装在单独的机器上,鉴权服务和人脸识别服务既可安装在同一台机器上,也可安装在不同的机器上。
我们使用的是单机部署模式,直接将数据库、鉴权及人脸服务都部署在同一台服务器上。
部署步骤
- 环境要求
百度部署说明上除了对操作系统版本诸如CentOS 7.2等有要求外,还有关于nvidia驱动,docker,nvidia-docker等,实际上在一键部署包里面,这些都已经做好了,没有必要自己安装啦。
- 部署包申请/获取指纹
服务器拿到以后,首先需要申请部署包。在部署包申请时,可以看到指纹提取工具下载地址,先在服务器上按要求提取指纹文件,然后加入申请表格中。


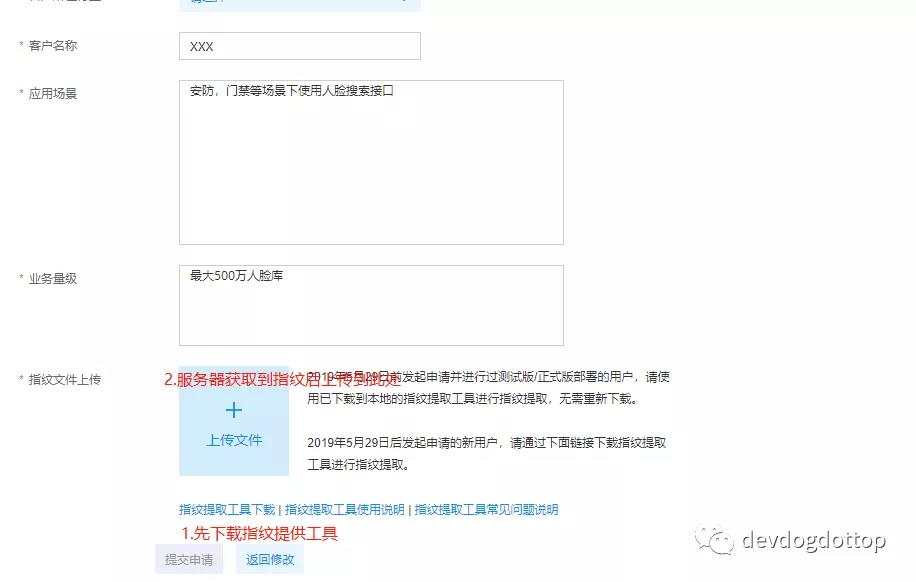
指纹提取工具上传到服务器,然后提取指纹。
指纹提取工具使用说明:
- 进入解压目录,执行 ./get_machine_finger_en 命令提取指纹;如果存在无执行权限的情况,执行chmod +x get_machine_finger_en后重试;
- 命令执行结果在在/tmp目录下,文件名为secfile_xx格式的文件即为指纹文件,后面是xx是机器名;
- 如果有多台机器,在多台机器按照上面的1和2步骤操作后,将多台机器的指纹文件搜集起来,比如通过U盘转移;
- 将所有的指纹文件存档到一个文件目录下,该目录下只能有指纹文件;
- 创建压缩包,进入指纹文件存储的目录,执行命令 tar cvzf ../finger.tar.gz ./*,在上一级目录生成了名字为finger.tar.gz的压缩包,注意检查该压缩包的目录结构,解压后直接就是指纹文件,没用多余的文件目录;
注意:
- 尽量使用root账号采集指纹,部署应用和采集指纹时的账号需要一致,避免因账号权限不同导致指纹信息不匹配
- 压缩包目录结构一定要检查一下,注意检查该压缩包的目录结构,解压后直接就是指纹文件,没用多余的文件目录。
[xux@localhost ~]$ cd fingerprint_tool/
[xux@localhost fingerprint_tool]$ ls
get_machine_finger_en  README
[xux@localhost fingerprint_tool]$ ll
总用量 312
-rwxrwxrwx 1 xux xux 311876 12月 10 09:55 get_machine_finger_en
-rw-r--r-- 1 xux xux    822 12月 10 09:55 README
[xux@localhost fingerprint_tool]$ ./get_machine_finger_en
get machine finger start
get machine finger end
[xux@localhost fingerprint_tool]$ ll /tmp/sec*
-rw-rw-r-- 1 root root 109 12月 10 09:58 /tmp/secfile_localhost.localdomain
[xux@localhost fingerprint_tool]$
申请通过以后,下载部署包,并上传至服务器。
- 正式部署
安装百度部署文档上的步骤[https://ai.baidu.com/ai-doc/FACE/Ik37c1is5],一步一步做下来基本没有发现什么问题。通过 curl http://ip:8300/face-api/v3/app/list 查看是否应答成功,err_code为0,就大功告成了!
部署时有个环境检查工具来确保没有问题,最后会有个检查结果:pass 或者 fail。
______         _      _           _____                    ______               _| ___ \       (_)    | |         |  ___|                   | ___ \             | || |_/ /  __ _  _   __| | _   _   | |__    __ _  ___  _   _ | |_/ /  __ _   ___ | | __| ___ \ / _` || | / _` || | | |  |  __|  / _` |/ __|| | | ||  __/  / _` | / __|| |/ /| |_/ /| (_| || || (_| || |_| |  | |___ | (_| |\__ \| |_| || |    | (_| || (__ |   <\____/  \__,_||_| \__,_| \__,_|  \____/  \__,_||___/ \__, |\_|     \__,_| \___||_|\_\                                                      __/ |                                                     |___/--------------------------------------------------------------------------------------
[default] environment checking start
>>>>>>>>>>>>>service_command checking: ... pass
>>>>>>>>>>>>>cpu_digit checking: ... pass( claim is .*x86_64.*, real is x86_64 )
>>>>>>>>>>>>>glibc_version checking: ... pass( claim is 2.14, real is 2.17 )
>>>>>>>>>>>>>python_version checking: ... pass( claim is 2.7, real is 2.7.5 )
>>>>>>>>>>>>>glibcxx_version checking: ... pass( claim is 3.4.19, real is 3.4.19 )
>>>>>>>>>>>>>disk_home checking: ... pass( claim is >=512 GB, real is 37888 GB )
>>>>>>>>>>>>>cpu_model checking: ... pass( claim is .*(Intel|AMD).*, real is 56  Intel(R) Xeon(R) Gold 5117 CPU @ 2.00GHz )
>>>>>>>>>>>>>release_version checking: ... pass( centos 7.7.1908 )
>>>>>>>>>>>>>gcc_version checking: ... pass( claim is 4.8.2, real is 4.8.5 )
>>>>>>>>>>>>>root checking: ... pass
>>>>>>>>>>>>>network checking: ... pass( Get IP informations: em4:192.168.0.74/24 virbr0:192.168.122.1/24 docker0:172.17.0.1/16  )
[c-offline-security-server] environment checking start
>>>>>>>>>>>>>nic checking: ... pass( Find physics network interface card: p2p1 em4 p2p2 em3 em2 em1  )
>>>>>>>>>>>>>machine checking: ... pass
>>>>>>>>>>>>>instruction_set checking: ... pass
>>>>>>>>>>>>>memory checking: ... pass( claim is >=8 GB, real is 251 GB )
>>>>>>>>>>>>>port checking: ...
	port 8443 cheking... not in use
	port 7091 cheking... not in use
	port 7092 cheking... not in use
	pass
[face-server] environment checking start
>>>>>>>>>>>>>disk_image checking: ... pass( claim is >=100 GB, real is 37888 GB )
>>>>>>>>>>>>>selinux checking: ... pass
>>>>>>>>>>>>>memory checking: ... pass( claim is >=32 GB, real is 251 GB )
>>>>>>>>>>>>>release_version checking: ... pass( centos 7.7.1908 )
>>>>>>>>>>>>>docker_version checking: ... fail( claim is 17.12, real is 1.13.1 )
[nvidia] environment checking start
>>>>>>>>>>>>>nvidia_docker_version checking: ... fail( claim is 2.0.2, real is 1.0.1 )
>>>>>>>>>>>>>nvidia_memory checking: ... pass( claim is >=6 G, real is 7 G )
>>>>>>>>>>>>>nvidia_driver checking: ... fail( claim is 384.66, real is 375.66 )
>>>>>>>>>>>>>nvidia_model checking: ... pass( claim is [u'Tesla P40', u'Tesla P4', u'GTX 1070', u'GTX 1080', u'GTX 1080 Ti'], real is Tesla P4 )
[docker] environment checking start
>>>>>>>>>>>>>kernel_version checking: ... pass( claim is 3.10, real is 3.10.0 )
The conclusion of environment checking is :fail
未通过的检查项详情如下:You can use 'pip install prettytable' to use PrettyTable.
模块              检查项            指标要求       实际参数或报错信息
face-server      docker_version                    claim is 17.12, real is 1.13.1
nvidia    nvidia_docker_version                 claim is 2.0.2, real is 1.0.1
nvidia        nvidia_driver                    claim is 384.66, real is 375.66
Press any key to quit.
Press 'continue' to continue the installation without guarantee of success.
总结下来就是:
[default]
- cpu_digit: .x86_64.
- glibc_version:2.14
- python_version: 2.7
- glibcxx_version:3.4.19
- disk: >=512 GB
-
cpu_model:*(Intel AMD).* - release_version: centos 7.2
- gcc_version: 4.8.2
- root权限
- network:固定ip
[c-offline-security-server]
- nic:至少一个网卡
- machine: x86_64
- instruction_set:x86
- memory checking: >=8 GB
- port:8443,7091,7092端口没有被占用
[face-server]
- disk_image: >=100 GB
- selinux:关闭
- memory: >=32 GB
- release_version:centos 7.2
[nvidia]
- nvidia_memory: >=6 G
- nvidia_driver:384.66
- nvidia_model: [u’Tesla P40’, u’Tesla P4’, u’GTX 1070’, u’GTX 1080’, u’GTX 1080 Ti’]
[docker]
- kernel_version: 3.10
以上环境检查有问题是因为服务器centos安装好以后,我又安装了nvidia驱动,以及docker和nvidia_docker,但是版本和实际需要的版本不符。其实不用这么麻烦,因为百度已经在一键部署包里面将这些都已经做好了,这里将这些都卸载就好了。最后,重新运行一键部署包,环境检查那里看到最后那个pass就好了。继续,直至成功完成。
# python install.py inall
______         _      _           _____                    ______               _| ___ \       (_)    | |         |  ___|                   | ___ \             | || |_/ /  __ _  _   __| | _   _   | |__    __ _  ___  _   _ | |_/ /  __ _   ___ | | __| ___ \ / _` || | / _` || | | |  |  __|  / _` |/ __|| | | ||  __/  / _` | / __|| |/ /| |_/ /| (_| || || (_| || |_| |  | |___ | (_| |\__ \| |_| || |    | (_| || (__ |   <\____/  \__,_||_| \__,_| \__,_|  \____/  \__,_||___/ \__, |\_|     \__,_| \___||_|\_\                                                      __/ |                                                     |___/
--------------------------------------------------------------------------------------
2019-12-12 11:37:25,141 - 25322 - install - INFO - start to prepare work directory...
2019-12-12 11:37:25,142 - 25322 - install - INFO - install option: inall, user name: baidu
2019-12-12 11:37:25,143 - 25322 - install - INFO - start to check python version...
2019-12-12 11:37:25,143 - 25322 - install - INFO - start to check current user...
2019-12-12 11:37:25,143 - 25322 - install - INFO - start to check integrity of this package...
2019-12-12 11:37:25,143 - 25322 - install - INFO - start to prepare docker_time_deal.sh...
2019-12-12 11:37:25,143 - 25322 - install - INFO - start to check the environment...
[default] environment checking start
>>>>>>>>>>>>>service_command checking: ... pass
>>>>>>>>>>>>>cpu_digit checking: ... pass( claim is .*x86_64.*, real is x86_64 )
>>>>>>>>>>>>>glibc_version checking: ... pass( claim is 2.14, real is 2.17 )
>>>>>>>>>>>>>python_version checking: ... pass( claim is 2.7, real is 2.7.5 )
>>>>>>>>>>>>>glibcxx_version checking: ... pass( claim is 3.4.19, real is 3.4.19 )
>>>>>>>>>>>>>disk_home checking: ... pass( claim is >=512 GB, real is 37888 GB )
>>>>>>>>>>>>>cpu_model checking: ... pass( claim is .*(Intel|AMD).*, real is 56  Intel(R) Xeon(R) Gold 5117 CPU @ 2.00GHz )
>>>>>>>>>>>>>release_version checking: ... pass( centos 7.7.1908 )>>>>>>>>>>>>>gcc_version checking: ... pass( claim is 4.8.2, real is 4.8.5 )
>>>>>>>>>>>>>root checking: ... pass
>>>>>>>>>>>>>network checking: ... pass( Get IP informations: em4:192.168.0.74/24 virbr0:192.168.122.1/24  )
[c-offline-security-server] environment checking start
 >>>>>>>>>>>>>nic checking: ... pass( Find physics network interface card: em2 em4 p2p2 em3 p2p1 em1  )
>>>>>>>>>>>>>machine checking: ... pass
>>>>>>>>>>>>>instruction_set checking: ... pass
>>>>>>>>>>>>>memory checking: ... pass( claim is >=8 GB, real is 251 GB )
>>>>>>>>>>>>>port checking: ...
              port 8443 cheking... not in use
             port 7091 cheking... not in use
             port 7092 cheking... not in use
             pass
[face-server] environment checking start
>>>>>>>>>>>>>disk_image checking: ... pass( claim is >=100 GB, real is 37888 GB )
>>>>>>>>>>>>>selinux checking: ... pass
>>>>>>>>>>>>>memory checking: ... pass( claim is >=32 GB, real is 251 GB )
>>>>>>>>>>>>>release_version checking: ... pass( centos 7.7.1908 )
>>>>>>>>>>>>>docker_version checking: ... pass( docker not installed, it will be installed with service. )
[nvidia] environment checking start
>>>>>>>>>>>>>nvidia_docker_version checking: ... pass( nvidia-docker not installed, it will be installed with service. )
>>>>>>>>>>>>>nvidia_memory checking: ... pass( claim is >=6 G, real is 7 G )
>>>>>>>>>>>>>nvidia_driver checking: ... pass( claim is 384.66, real is 430.40 )
>>>>>>>>>>>>>nvidia_model checking: ... pass( claim is [u'Tesla P40', u'Tesla P4', u'GTX 1070', u'GTX 1080', u'GTX 1080 Ti'], real is Tesla P4 )
[docker] environment checking start
>>>>>>>>>>>>>kernel_version checking: ... pass( claim is 3.10, real is 3.10.0 )
The conclusion of environment checking is :pass
部署完成以后,人脸服务将自动起来,可以curl测试api接口。人脸Api接口端口固定为8300。
- 碰到的问题及解决办法
百度私有化部署文档很多已经说的足够清楚了,这里说下我在部署中碰到的几个问题:
- 厂商给安装的CentOS 8系统,他们自己忘记了root密码。无奈,只能自己重新下载了CentOS 7.2的系统,然后刻盘重装系统!
- 自己多年前曾在读写器上做过linux裁剪和移植,但现在大部分linux系统命令都已经快忘得差不多了,重新bing各种命令。算是再次学习了一次吧。
- 一键部署以后服务器每次重启后,人脸服务都没法正常起来。nvidia-smi命令返回Driver/library version mismatch错误,按照此方法完美解决:root权限rmmod nvidia(有依赖项如nvidia_modeset, nvidia_drm先卸载) 再重启docker restart即可。这个部分我后续会写个启动脚本来解决。
[root@localhost yum.repos.d]# nvidia-smi
Failed to initialize NVML: Driver/library version mismatch
[xux@localhost ~]$ su root
密码:
ABRT 已检测到 '2' 个问题。预了解详细信息请执行:abrt-cli list --since 1576219734
[root@localhost xux]# rmmod nvidia
rmmod: ERROR: Module nvidia is in use by: nvidia_modeset
[root@localhost xux]# rmmod nvidia_modeset
rmmod: ERROR: Module nvidia_modeset is in use by: nvidia_drm
[root@localhost xux]# rmmod nvidia_drm
[root@localhost xux]# rmmod nvidia_modeset
[root@localhost xux]# rmmod nvidia
[root@localhost xux]# nvidia-smi
Fri Dec 13 15:18:11 2019       +-----------------------------------------------------------------------------+| NVIDIA-SMI 430.40       Driver Version: 430.40       CUDA Version: 10.1     ||-------------------------------+----------------------+----------------------+| GPU  Name        Persistence-M| Bus-Id        Disp.A | Volatile Uncorr. ECC || Fan  Temp  Perf  Pwr:Usage/Cap|         Memory-Usage | GPU-Util  Compute M. ||===============================+======================+======================||   0  Tesla P4            Off  | 00000000:3B:00.0 Off |                    0 || N/A   44C    P0    23W /  75W |      0MiB /  7611MiB |      2%      Default |+-------------------------------+----------------------+----------------------++-----------------------------------------------------------------------------+| Processes:                                                       GPU Memory ||  GPU       PID   Type   Process name                             Usage      ||=============================================================================||  No running processes found                                                 |+-----------------------------------------------------------------------------+
[root@localhost xux]# docker version
Client: Version:      17.06.2-ce
API version:  1.30
Go version:   go1.8.3
Git commit:   cec0b72
Built:        Tue Sep  5 19:59:06 2017
OS/Arch:      linux/amd64
Server: Version:      17.06.2-ce
API version:  1.30 (minimum version 1.12)
Go version:   go1.8.3
Git commit:   cec0b72
Built:        Tue Sep  5 20:00:25 2017
OS/Arch:      linux/amd64
Experimental: false
[root@localhost xux]# docker info
Containers: 1 Running: 0 Paused: 0 Stopped: 1Images: 2Server Version: 17.06.2-ceStorage Driver: overlay Backing Filesystem: xfs Supports d_type: falseLogging Driver: json-fileCgroup Driver: cgroupfsPlugins:  Volume: local Network: bridge host macvlan null overlay Log: awslogs fluentd gcplogs gelf journald json-file logentries splunk syslogSwarm: inactiveRuntimes: nvidia runcDefault Runtime: runcInit Binary: docker-initcontainerd version: 6e23458c129b551d5c9871e5174f6b1b7f6d1170runc version: 810190ceaa507aa2727d7ae6f4790c76ec150bd2init version: 949e6faSecurity Options: seccomp  Profile: defaultKernel Version: 3.10.0-327.el7.x86_64Operating System: CentOS Linux 7 (Core)OSType: linuxArchitecture: x86_64CPUs: 56Total Memory: 251.2GiBName: localhost.localdomainID: 3I5B:DURB:MQZV:KCVN:Q2BC:JC3A:ZAXU:ZXFH:MQTY:A4NJ:RGDQ:3FZ3Docker Root Dir: /home/baidu/dockerDebug Mode (client): falseDebug Mode (server): falseRegistry: https://index.docker.io/v1/Experimental: falseInsecure Registries: 127.0.0.0/8Live Restore Enabled: falseWARNING: overlay: the backing xfs filesystem is formatted without d_type support, which leads to incorrect behavior.         Reformat the filesystem with ftype=1 to enable d_type support.         Running without d_type support will not be supported in future releases.WARNING: bridge-nf-call-iptables is disabledWARNING: bridge-nf-call-ip6tables is disabled
[root@localhost xux]# docker ps -a
CONTAINER ID        IMAGE               COMMAND                  CREATED             STATUS                        PORTS               NAMES9883972f8aff        300478125c1e        "/home/idl-face/ta..."   25 hours ago        Exited (137) 10 minutes ago                       face-service-0-0
[root@localhost xux]# docker restart 98839883
[root@localhost xux]# curl 192.168.0.74:8300/face-api/v3/app/list{"error_code":0,"error_msg":"SUCCESS","log_id":1357212138,"timestamp":1576221757,"cached":0,"result":{"app_id_list":[]}}
[root@localhost xux]#
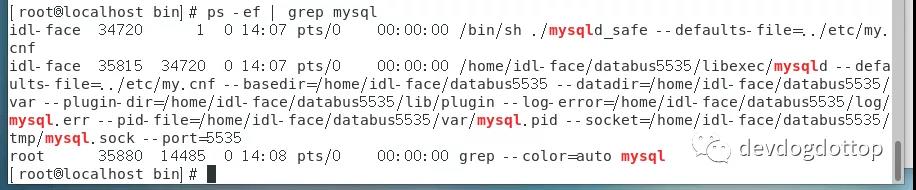
- 调用接口返回error_code 222910错误:最终发现是防火墙未打开mysql数据库5535端口。打开防火墙5535端口,如下,其中3389为远程桌面rdp端口。
[root@localhost c-offline-security-server]# firewall-cmd --query-port=5535/tcpno
[root@localhost c-offline-security-server]# firewall-cmd --list-port3389/tcp
[root@localhost c-offline-security-server]# firewall-cmd --zone=public --add-port=5535/tcp --permanent
success
[root@localhost c-offline-security-server]# firewall-cmd --list-port3389/tcp
[root@localhost c-offline-security-server]# firewall-cmd --reload
success
[root@localhost c-offline-security-server]# firewall-cmd --list-port
3389/tcp 5535/tcp
[root@localhost c-offline-security-server]# curl 192.168.0.74:8300/face-api/v3/app/list{"error_code":0,"error_msg":"SUCCESS","log_id":2764973042,"timestamp":1576136764,"cached":0,"result":{"app_id_list":[]}}
[root@localhost c-offline-security-server]#
-
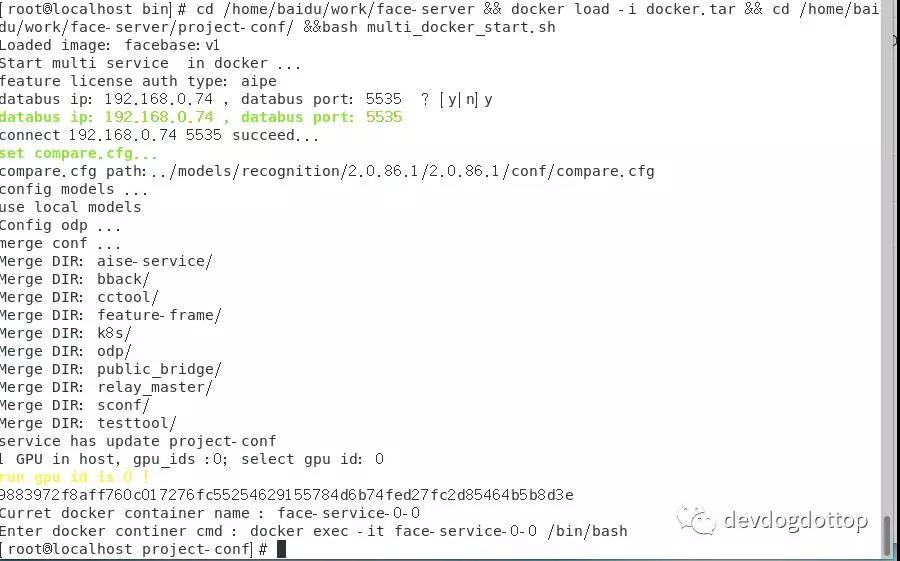
部署时出现错误CalledProcessError,Command ‘cd /home/baidu/work/face-server/project-conf && bash multi_docker_start.sh’ returned non-zero exit status 1,
数据库服务无法自动部署,按照常见问题及排查手动部署并设置服务开机自动启动
2019-12-12 11:39:39,727 - 25322
- install - INFO - start to copy face-server files to /home/baidu/work/face-server2019-12-12 11:41:21,204 - 25322
- install - INFO - create easypack_init.sh...2019-12-12 11:41:21,204 - 25322
- install - INFO - Check if install mode is single: False 2019-12-12 11:41:21,204 - 25322
- install - INFO - subprocess start,cmd : cd /home/baidu/work/face-server/project-conf && bash multi_docker_start.shdatabus ip: 192.168.0.74 , databus port: 5535  ? [y|n]2019-12-12 11:41:51,217 - 25322 - install - ERROR - subprocess failed,exception occurred: Command 'cd /home/baidu/work/face-server/project-conf && bash multi_docker_start.sh' returned non-zero exit status 1Traceback (most recent call last):  File "/home/xux/deployment_test/original/package/Install/shell.py", line 77, in run_with_check_out    sp.check_output(args, shell=True)  File "/usr/lib64/python2.7/subprocess.py", line 575, in check_output    raise CalledProcessError(retcode, cmd, output=output)CalledProcessError: Command 'cd /home/baidu/work/face-server/project-conf && bash multi_docker_start.sh' returned non-zero exit status 12019-12-12 11:41:52,909 - 25322 - install - ERROR - install face-server failed!

完成!